Showing posts with label reverb. Show all posts

Friday, January 30, 2015

Reverb

There's a lot that can be said about reverb.  I'll try to condense what i know and how i set them up In the next lines.  Just like you should tweak presets, you should take here what works for you and then expend on it.  Younger engineers might be a bit overwhelmed by all the info i'm about to dish out.  The overall techniques however can be used by anyone and experimentation is highly encourage.  Lets dive into it.

A general approach to setting up reverb is to create a virtual sound stage ( think of it as the space your music is being played in ).  Using  four reverb sends per session is not uncommon for me.  They each represent a section of the virtual stage.  I've made my self a mixing template and i very much encourage you to do so too.  Working with a template is a great way of moving forward and developing your abilities.  You'll spend less time a/b'ing plugins and more time understanding how to use them properly. 
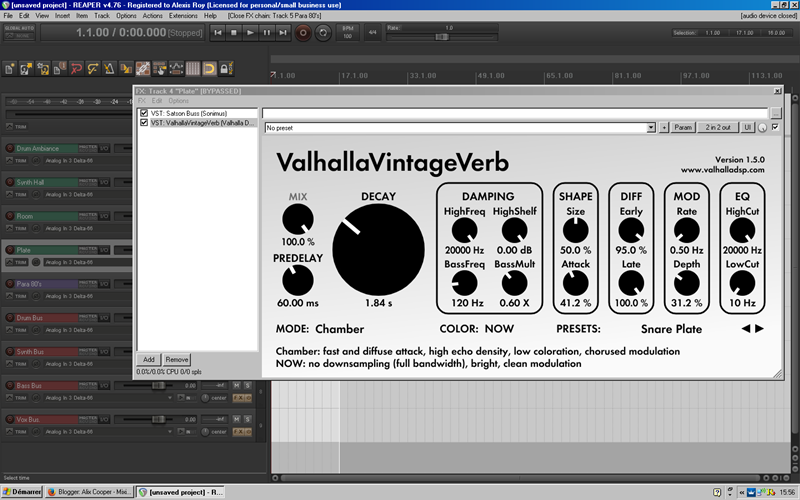


My go-to reverb plugin is the Valhalla Vintage Verb.  I have four instances of it as a starting point in my template.  A hall, a room, an ambiance and a plate.  They are all set up with presets i like and feel will work on most material but they are starting points only and i always tweak them to some degree. The hall represents the back end of the sound stage.  It's going to help me push thing behind the drums and the bass.  The room represents the middle.  Most instrument will live in the middle room to some extend.  It's where the glue factor resides.  The ambiance/short room is for the front end. This one is dedicated to drums and leads. It's also going to help me add a sens of width to dryer and narrower  instruments. The plate serves other purposes.  It's there to highlight some sounds and doesn't contribute to the sound stage as much as the three other ones. 

When talking reverb the discussion about Inserts vs sends always creep up very fast.  My thoughts on the subject are quite simple.  Sends are best used to provide a glue factor amongst multiple tracks while  inserts are best suited for specific tracks you wish to highlight or for creating an effect.  Example of this would be sending a few strings tracks to a hall vs inserting a huge plate with a long pre-delay on a snare layer to create a rhythmic effect.   

Every reverb as a set of parameters that you should tweak to get the most out of them and to make them work better within the context of the song at hand. Lets take a look at them.

Pre-Delay

Pre-delay determines the time that separates the direct sound and the sound of the reverb ( see pic. ).  Theoretically speaking, the longer the pre-delay the closer the sound will feel and the shorter the pre-delay the further away it will be perceived.  Imagine your self in an empty warehouse.  If you stand 2 feet away from a microphone, that the closest wall is 15 feet away and that you clap in your hands, it'll take roughly 2 ms ( around 1 ms per foot ) for the direct sound of of the clap to reach the mic and 30ms for the reverberate sound to do so.  Therefore you will have a 28ms pre-delay.  Now, in the same warehouse go stand 1 foot away from the wall and clap again.  This time it's going to take 14ms for the initial clap sound to reach the mic and 16ms for the reverberate sound.  Making it a 2 ms pre-delay.  

The human ear is very sensible to pre-delay, especially on percussive elements.  If you have for example a 30ms pre-delay on a drum room you risk making it too audible and obtrusive to the drum groove.  A rule of thumb i learned in school was that for drums it's best to keep the pre-delay under 10ms ( unless you are trying to create some type of rhythmic fx then you should stick to note values like a 32th or a 16th note ) So bringing the pre delay back to 8-9 ms should leave the drum groove intact and give you just enough separation to emulate a "real" room.

Some good starting values for halls would be between 20 and 30ms, for rooms between 10 and 20ms and under 10ms for ambiances/short rooms.

I know it seems contradictory to what i just explained but a 10x10 room can't have a pre-delay much longer then 5ms and a 20x50 hall is more likely to have a 20ms pre-delay then a 0ms pre-delay. It doesn't mean that a very short pre-delay on a hall is not realistic or that it's bad.  Of course if the song calls for a 0 pre-delay hall to push some elements very far in the back by all means do use it. 


Decay Time

Decay time is pretty self explanatory if you ask me,  it's the time the tail of the reverb will last.  In a hall it might last 1200 ms.  In a short room it might last 150 ms.  One of the great ways to create confusion in your sound stage is by having pre-delays and decay times that don't work together or that don't respect the role they are supposed to accomplished.  Most of the time i keep decay time in line with the song tempo.  It's a fairly simple way to go about it and frankly it as work well for me thus far so why change ?

There's a plugin in JS format included in Reaper that calculates the note values for me so i don't have to do it every time but if you don't have such a tool at your disposal you can easily calculate it your self with the following formula:  60 000 / Tempo = 1/4th note.  For example,  you take 60 000 ( which is the amount of ms  in a minute ) divide it by 120 ( which is the tempo ) and you get 500 which is the value in ms for a 1/4 note.  From the 1/4 note you can either multiply it by 2 to get the 1/2th note which is 1000ms, by 4 to the the whole note which is 2000ms or divide it by 2 to get the 1/8th note which is 250ms or by 4 to get he 16th note which is 125ms.

Frankly, i don't know why there isn't a reverb out there with a tempo sync decay time.  Would make so much sens to me ( wink wink devs ) anyways.

Damping

Damping is the natural high frequency roll off that occurs in a room in regard to what shape it has and what type of material the walls are build in.  A hard surface will reflect high frequencies more then a soft one.  A concrete room will sound a lot more reverberate then a room with plaster walls and a few sofas in it.  Same goes for a tilled bathroom compared to a bedroom.  To be honest though,  i mostly adjust it so that it fits the song rather them imagine what type of walls my virtual sound stage has.  I think of it as a tone control more then anything else.

One thing to keep in mid while adjusting damping is that the further away you want a reverb to sound the less high frequencies it should have.  High frequencies have less energy then low frequencies so they die out more quickly trough space and time.  Having a bright hall at the back end of a dark ambiance might sound unnatural and conflicting to the listener's ears.  Although there's not hard rule about it when it comes to damping i tend to work in the 4-8khz region most of the time.


EQ

Eq'ing aux return is a common practice.  It helps you to tailor the sound stage a step further.  I don't know how others go about it but a three band eq is usually sufficient for my own needs.  A highpass filter, a lowpass filter and a wide bell for the midrange are a good place to start.  Some pro mixer recommend using shelfs instead of highpass/lowpass filters.  Shelfs are less drastic and a bit more musical but i use both, sometimes a shelve is just not enough.  By removing low frequencies you will help the bass and the kick to stand out as it will prevent the reverbs from muddying up the low midrange.  On my aux return i tend to roll off everything under 125Hz.  It might be a bit high for some people so i recommend you to start at 80Hz and move up from there.  On fx and plate it's not rare that i will go higher then 250Hz. 

Like discussed previously, low passing the reverb can help it move to the back of the sound stage.  The opposite is also true.  Adding high frequencies will help it move forward.  When i lowpass reverb i try not to go lower then 6-8Khz.  If i need to go lower then that i will probably go back to the reverb it self and make some adjustments there.   The middle bell is a big help on dense reverb and boxy sounding room.  Seems to me like the least pleasing room tones are in the 400-1200Hz region. Cutting there opens up the mix and make it less clustered. 

Mixing Reverbs

A thing i do more and more is mixing the reverbs together.  I'll solo them and try to make them fit as if they were coming from the same environment.  It also makes it easier to ear what each is bringing to the table.  I will slightly adjust the eq i've dialed in before in a aim for cohesiveness.  A db here and there is usually enough.  I would recommend you to a/b the change you make at this point by unsoloing the reverbs and see how they work in the context of the full song.

So that's it for now.  Maybe i'll do a part two and talk about panning, mono reverbs, compressing and gating them.  They're useful techniques but i felt they were too much for the present article.  Feel free to drop me a message though  if such subjects interest you.

Enough Internet for now. Go mix something already ;)

Sunday, December 28, 2014

Side note #1 - Plugins recommendation

In the first post i made on this blog i said i wasn't going to offer reviews of products nor keep you informed about products updates.  One thing i would like to do though is recommend you some plugins i use on a daily basis and tell you why i like them.  So here it is. This 4th instalment will be about plugins recommendation. Hope you find something to add to your toolbox.

1- Eq - TB Equalizer ( 25$ as part of the TrackEssentials pack )

I have to admit there's a lot of contender in this price range of the market. DDMF, Overtone DSP, even Reaper's own ReaEq ( just to name a few )  But the thing that makes the TB eq stand out for me is the work flow.  It has an auto gain function for each band which, if you haven't work with this kind of feature before, adjusts the output of the plugin in relation to the input.  In other words, unless you are using extreme eq setting, the volume will remain the same if you bypass the plugin. Because your decisions aren't based on volume changes it's a lot easier to ear how the curves you are dialing affect the tone of the instrument and it's placement in the mix.  Now that i'm used to it,  i can't see myself going back working without it.

Second thing about the TB eq i like a lot is how the mouse wheel works with the different parameter values.  I work a lot with the mouse wheel and this is the eq that is most comfortable to me. 1db increment for every  band in the bottom tool bar. Perfect.

There's also a spectrum analyzer that you can turn on/off.  Some might say that this is not a big selling point but to me it is. The ReaEq has it permanently showing. Great for finding troublesome area but you kinda end up eq'ing with your eyes and not your ears. The DDMF IIEQ Pro spectrum analyzer isn't very unstable on my system. Sometimes it works, sometimes it doesn't. IIEQ PRo was my go to eq before i got the TB eq.  It has some features that the TB eq doesn't have so i still use it.  It's by no mean a bad eq.

http://www.toneboosters.com/tb-equalizer/


2- Compressor- Hornet ChannelStrip MK2 ( Hornet MultiComp )
( 72 $ for ChannelStrip MK2, 43$ for the MultiComp )

Compression might deserve a status entry of it's own but what the heck...i'll try to keep it simple. 
The Hornet ChannelStrip features two MultiComp and one eq.  You can rearrange the order of the 3 processors.  I generally like to compress before i eq so for me it's Dynamic1 fallowed by Dynamic2 and then by the Eq.  There is some times where i might put Dynamic2 at the end of the chain and make it act like a limiter to catch some peaks here and there. You can, of course, switch them on and off individually.

The compressors can do a lot.  They both have 3 compression mode. Fet (1176), Opto (La2a),
VCA ( a hard knee feed forward rms comp a la SSL ).  These are generally the 3 types of compressor i think of when i need compression so it is very intuitive to me.  It's easy to set up the very popular  La2a > 1176 ( or vice verse ) > EQ chain in one plugin instance.  That's definitely a plus. The Eq is a mix between an SSL type eq for the mid bands, a resonant low shelf à la pultec for the low shelf and an " aggressive " console high shelf  ( which i'm not sure if it's supposed to be SSL or API like ) The eq makes it possible to clean up a track and give it some color at the same time.  An auto gain compensation would truly rock my world.  Still,  it's a great complement to the TB eq.  The plugin it self is light and easy to set up.  It sounds great and covers 90% of my compression needs

Also worth mentioning, when you turn the analog switch on, the plugin will engage 1 of it's 3 different saturation algorithms. A different one for each compressor and an other one for the Eq. There's also the very popular oversampling switch which is not that heavy at all compared to a wide range of other plugins i've tried.  Kudos Hornet !
The only difference between the MultiComp as a solo instance and the MultiComp in the ChannelStrip is an added hi pass filter in the detection circuit and a sidechain input.  Check out the new MultiComp Plus for some new features.

http://www.hornetplugins.com/plugins/hornet-multicomp-vst-compressor/


3- Reverb- Valhalla Vintage Verb ( 50$ )

I often use 3/4 reverbs Fx return per mix and more then often they are all provided by the same vst. A hall, a room, a plate and an ambiance sends are what i use 95% of the time.  Prior to working with Valhalla Vintage verb i was working a lot with Audio Damage Eos which i find out recently was coded by Mr. Sean Costello who is also the founder of Valhalla reverbs ( coincidence ?? )

This thing just sounds good to me no mater what.  Bunch of great presets to get you started.  I usually just tweak a few parameters and i'm right where i want to be.  The Shape Attack it's where it's at for me. It helps you place the wet signal far or near in the "virtual room".  A lot of attack will push the sound further in the
sound field and a short attack will bring it forward.  So once you have set how you want your virtual room to sound you can easily change the position of the sound in it.  Awesome !

I choose the VintageVerb over the Valhalla Room because it says that it is reminiscent of  the 80's reverbs and that RoomVerb was more of a real space kind of thing.  Since i make 80's inspired electro music i felt the choice was obvious.  You might chose otherwise but after trying them both i can honestly say that they are extremely well made and easy to use.  I wish they were a bit lighter on cpu but for the sound they provide i feel it is totally worth it. 

https://valhalladsp.com/shop/plugins/valhalla-vintage-verb/


4- Saturation - TB ( TB Ferox free, TB ReelBus 25$, TB time machine free )

I ear you.  Is this an add for Tonebooster's plugin or what ? No.... but it could be.  I mean i like his stuff very much. His track essential compressor ( even if it's not my go to ) is a really good and easy to set up general track compressor.  His Eq as become my go to Eq.  His bus compressor is a staple on my master bus since i got it some months ago.  His reverb used to be one of my go to reverbs for it's cool presets and lite footprint on the cpu ( of course i still use it ).  His limiter is again my go to limiter and his saturation tools are.... well,  the only ones i use.

Ferox and ReelBus are both tape saturation emulation.  Ferox is a more straight up saturation tool and ReelBus is a dedicated tape emu.  I mainly use Ferox on single tracks and on some busses ( try the tape compression preset on the drum bus ) and i use ReelBus on the master bus.  Ferox can also act as a tape delay ( very cool ) Of course ReelBus is heavier on the cpu being a more realistic emulation.  Most time i choose the preset that suits the song best and i tweak the big Drive knob so that the VU needle hits the center 0 db mark ( not the one before the redline ) It is the last thing on my master bus before the limiter and it contributes to the 'glue' factor a whole lot.

Time Machine is a bit crusher/sample reducer plugin.  Aside for some bit crunching on drums and on some synths i mainly use it for its analogue warmth preset. It sounds so good. It just compresses the sound a tiny bit, rounds it up, darkens it a touch.  Its what i feel hardware tools should sound like.

http://www.toneboosters.com/tb-ferox/